
CCNA Routing and Switching
Connecting Networks
Connecting Networks
Practice Skills Assessment – Packet Tracer
A few things to keep in mind while completing this activity:
- Do not use the browser Back button or close or reload any exam windows during the exam.
- Do not close Packet Tracer when you are done. It will close automatically.
- Click the Submit Assessment button in the browser window to submit your work.
Introduction
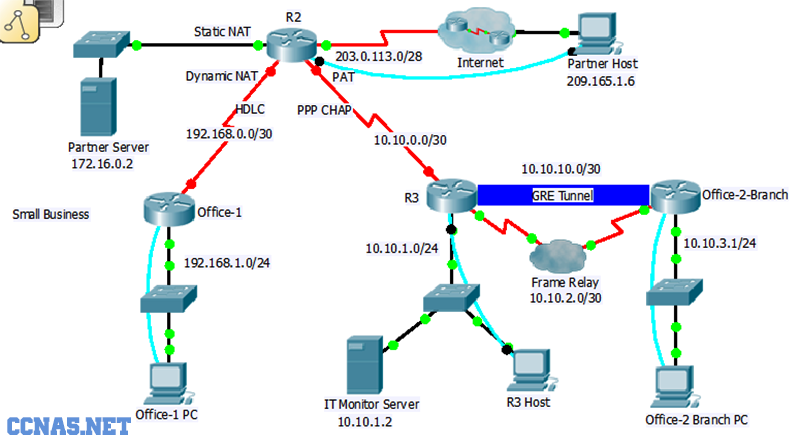
In this practice skills assessment, you will configure the Small Business network with NTP, SNMP, EIGRP, PPP CHAP, Frame Relay, dynamic NAT, static NAT, PAT and a GRE tunnel.
Some values that are required to complete the configurations may not have been given to you. In that case, create the values that you need to complete the requirements.
For the sake of time, many repetitive, but important, configuration tasks have been omitted from this assessment. Many of these tasks, especially those related to security, are essential elements of a network configuration. The intent of this activity is not to diminish the importance of full device configurations.
You will practice and be assessed on the following skills:
- Configuration of NTP
- Configuration of SNMP and Syslog
- Configuration of interface addressing and basic settings
- Configuration of HDLC
- Configuration of Frame Relay
- Configuration of PPP
- Configuration of CHAP
- Configuration of a GRE tunnel
- Configuration of static and dynamic routing
- Configuration of dynamic NAT
- Configuration of static NAT
- Configuration of PAT
You are required to configure the devices as follows:
Office-1:
Office-1:
- Configure HDLC.
- Configure EIGRP.
- Configure passive interfaces.
R2:
- Configure PPP and CHAP authentication on the appropriate interface.
- Configure EIGRP.
- Configure static NAT for outside access to an internal server.
- Configure dynamic NAT.
- Configure PAT.
R3:
- Enable time stamps for use with NTP and SNMP logging.
- Configure the router to use NTP services.
- Configure logging to the IT Monitor Server.
- Configure PPP and CHAP authentication on the appropriate interface.
- Configure Frame Relay.
- Configure a GRE tunnel.
- Configure EIGRP.
- Configure passive interfaces.
Office-2-Branch:
- Configure Frame Relay.
- Configure a GRE tunnel.
- Configure EIGRP.
- Configure passive Interfaces.
Tables
In some cases, specific interface addresses have been provided to you. You must use them in your configurations. In other cases, when a network is specified instead of a specific address, you can use any address in the network.
You do not configure LAN addresses in this activity. The addresses of the LAN interfaces are provided in this table for reference purposes only.
Device
|
Interface
|
IP Address or Network
|
Default Gateway
|
Office-1
|
G0/1
|
192.168.1.1/24
|
N/A
|
S0/0/0
|
192.168.0.0/30
|
N/A
| |
R2
|
G0/0
|
172.16.0.1/30
|
N/A
|
S0/0/0
|
192.168.0.0/30
|
N/A
| |
S0/0/1
|
10.10.0.0/30
|
N/A
| |
S0/1/0
|
203.0.113.1/28
|
N/A
| |
R3
|
G0/1
|
10.10.1.1/24
|
N/A
|
S0/0/0
|
10.10.2.1/30
|
N/A
| |
S0/0/1
|
10.10.0.0/30
|
N/A
| |
T0
|
10.10.10.1/30
|
N/A
| |
Office-2-Branch
|
G0/0
|
10.10.3.1/24
|
N/A
|
S0/0/0
|
10.10.2.2/30
|
N/A
| |
T0
|
10.10.10.2/30
|
N/A
| |
Partner Server
|
NIC
|
172.16.0.2/30
|
172.16.0.1
|
IT Monitor Server
|
NIC
|
10.10.1.2/24
|
10.10.1.1
|
Office-1 PC
|
NIC
|
192.168.1.5/24
|
192.168.1.1
|
R3 Host
|
NIC
|
10.10.1.5/24
|
10.10.1.1
|
Office-2 Branch PC
|
NIC
|
10.10.3.5/24
|
10.10.3.1
|
Instructions
All configurations must be performed through a direct terminal connection to the device console from an available host.
All configurations must be performed through a direct terminal connection to the device console from an available host.
Step 1: Configure NTP, SNMP, and Syslog settings on R3.
a. Configure NTP.
- Configure R3 to use IT Monitor Server as its NTP server.
- Use a key value of 15.
b. Configure SNMP.
- Use an SNMP community string of CiscoPTSA.
- Allow the SNMP management station only read only rights.
c. Configure Syslog.
- Configure R3 to use time stamps when logging. The timestamps should include milliseconds.
- Configure Syslog to send log entries to the IT Monitor Server.
- Set the message trapping for Syslog to the debugging level.
Step 2: Configure Frame Relay between R3 and Office-2-Branch.
Configure Frame Relay on the interfaces connecting R3 and Office-2-Branchusing the information from the Addressing Table. You must use the exact addresses specified in the addressing table for the configuration.
Step 3: Configure a GRE Tunnel between R3 and Office-2-Branch.
- Configure a GRE tunnel using Tunnel interface 0 on R3 to Office-2-Branch using information from the addressing table.
- Configure a GRE tunnel using Tunnel interface 0 on Office-2-Branchto R3 using information from the addressing table.
- You must use the exact addresses specified in the addressing table for this configuration.
Step 4: Configure DCE interfaces.
Configure the DCE interfaces of R2 with a clock rate of 128000.
Step 5: Configure PPP and CHAP between R2 and R3.
- Configure interface addressing according to information provided in the Addressing Table. You can use any address in the network specified in the Addressing Table for this configuration.
- Authenticate the PPP connection with CHAP on both ends of the link.
- Use the password of PTSAchap.
Step 6: Configure HDLC on Office-1 and R2.
It has been decided to remove an earlier PPP configuration from the link between Office-1 and R2.
- Configure this link with HDLC.
- Configure interface addressing according to information provided in the Addressing Table. You can use any address in the network specified in the Addressing Table.
Step 7: Configure NAT on R2.
All hosts should use translated addresses to access destinations outside of the Small Business network.
a. Configure static NAT.
- Configure static NAT for the IP address of the Partner Server.
- Use the last host address in the interface S0/1/0 subnet.
b. Configure dynamic NAT.
- Configure dynamic NAT for all host IP addresses on the LAN network connected to Office-1.
- Use DYNAMIC as the name for the pool.
- Use the third through tenth IP addresses that are available on the R2 S0/1/0 subnet.
- Configure ACL 1 to allow all host IP addresses in Office-1 LAN network to use this group of addresses.
- Your ACL should have one statement.
c. Configure PAT.
- Configure PAT to enable the hosts attached to the R3 and Office-2-Branch LANs to access the Internet.
- Use the interface keyword in the NAT statement.
- Use ACL 2 to allow all host addresses on both LAN networks to use the overload address.
- Your ACL should have two statements.
- Configure all interfaces on R2 as appropriate.
Step 8: Configure static and dynamic routing.
a. Configure dynamic routing.
- Configure EIGRP for all networks connected to Office-1, R2,R3, and Office-2-Branch.
- Use ASN 1.
- Use the precise inverse masks for all networks.
- Disable automatic summarization on all routers.
- Disable EIGRP updates from being sent on the appropriate interfaces. You must do this for each individual interface. Donot use the default keyword with the command.
b. Configure a redistribute a default route.
- Create a directly attached default route to the Internet on R2.
- Configure EIGRP to redistribute the default route to the other routers.
100% Correct Configurations
R3
ntp server 10.10.1.2 key 15
snmp-server community CiscoPTSA RO
logging trap debugging
logging 10.10.1.2
service timestamps log datetime msec
snmp-server community CiscoPTSA RO
logging trap debugging
logging 10.10.1.2
service timestamps log datetime msec
router eigrp 1
passive-interface GigabitEthernet0/1
network 10.10.0.0 0.0.0.3
network 10.10.2.0 0.0.0.3
network 10.10.1.0 0.0.0.255
no auto-summary
passive-interface GigabitEthernet0/1
network 10.10.0.0 0.0.0.3
network 10.10.2.0 0.0.0.3
network 10.10.1.0 0.0.0.255
no auto-summary
interface Tunnel0
no shutdown
ip address 10.10.10.1 255.255.255.252
tunnel source s0/0/0
tunnel destination 10.10.2.2
no shutdown
ip address 10.10.10.1 255.255.255.252
tunnel source s0/0/0
tunnel destination 10.10.2.2
int s0/0/0
no shut
encapsulation frame-relay
ip add 10.10.2.1 255.255.255.252
no shut
encapsulation frame-relay
ip add 10.10.2.1 255.255.255.252
username R2 password PTSAchap
int s0/0/1
no shut
encapsulation ppp
ppp authentication chap
ip add 10.10.0.2 255.255.255.252
no shut
encapsulation ppp
ppp authentication chap
ip add 10.10.0.2 255.255.255.252
R3-Branch
router eigrp 1
passive-interface GigabitEthernet0/0
no auto-summary
network 10.10.2.0 0.0.0.3
network 10.10.10.0 0.0.0.3
network 10.10.3.0 0.0.0.255
passive-interface GigabitEthernet0/0
no auto-summary
network 10.10.2.0 0.0.0.3
network 10.10.10.0 0.0.0.3
network 10.10.3.0 0.0.0.255
interface Tunnel0
no shutdown
ip add 10.10.10.2 255.255.255.252
tunnel source s0/0/0
tunnel destination 10.10.2.1
no shutdown
ip add 10.10.10.2 255.255.255.252
tunnel source s0/0/0
tunnel destination 10.10.2.1
int s0/0/0
ip add 10.10.2.2 255.255.255.252
encapsulation frame-relay
no shut
ip add 10.10.2.2 255.255.255.252
encapsulation frame-relay
no shut
R2
router eigrp 1
passive-interface GigabitEthernet0/0
no auto-summary
network 192.168.0.0 0.0.0.3
network 172.16.0.0 0.0.0.3
network 10.10.0.0 0.0.0.3
redistribute static
passive-interface GigabitEthernet0/0
no auto-summary
network 192.168.0.0 0.0.0.3
network 172.16.0.0 0.0.0.3
network 10.10.0.0 0.0.0.3
redistribute static
username R3 password PTSAchap
int s0/0/1
no shut
clock rate 128000
ip add 10.10.0.1 255.255.255.252
encapsulation ppp
ppp authentication chap
ip nat inside
no shut
clock rate 128000
ip add 10.10.0.1 255.255.255.252
encapsulation ppp
ppp authentication chap
ip nat inside
ip nat pool DYNAMIC 203.0.113.3 203.0.113.10 netmask 255.255.255.240
ip nat inside source list 1 pool DYNAMIC
ip nat inside source list 1 pool DYNAMIC
ip nat inside source list 2 interface Serial0/1/0 overload
ip access-list standard 2
permit 10.10.1.0 0.0.0.255
permit 10.10.3.0 0.0.0.255
permit 10.10.1.0 0.0.0.255
permit 10.10.3.0 0.0.0.255
ip access-list standard 1
permit 192.168.1.0 0.0.0.255
permit 192.168.1.0 0.0.0.255
int s0/0/0
no shut
clock rate 128000
ip add 192.168.0.2 255.255.255.252
encapsulation hdlc
ip nat inside
no shut
clock rate 128000
ip add 192.168.0.2 255.255.255.252
encapsulation hdlc
ip nat inside
ip route 0.0.0.0 0.0.0.0 s0/1/0
ip nat inside source static 172.16.0.2 203.0.113.14
int g0/0
ip nat inside
ip nat inside
int s0/1/0
ip nat outside
ip nat outside
router eigrp 1
passive-interface GigabitEthernet0/1
no auto-summary
network 192.168.0.0 0.0.0.3
network 192.168.1.0 0.0.0.255
passive-interface GigabitEthernet0/1
no auto-summary
network 192.168.0.0 0.0.0.3
network 192.168.1.0 0.0.0.255
int s0/0/0
no shut
ip add 192.168.0.1 255.255.255.252
encapsulation hdlc
no shut
ip add 192.168.0.1 255.255.255.252
encapsulation hdlc
R1
router eigrp 1
passive-interface GigabitEthernet0/1
no auto-summary
network 192.168.0.0 0.0.0.3
network 192.168.1.0 0.0.0.255
passive-interface GigabitEthernet0/1
no auto-summary
network 192.168.0.0 0.0.0.3
network 192.168.1.0 0.0.0.255
int s0/0/0
no shut
ip add 192.168.0.1 255.255.255.252
encapsulation hdlc
no shut
ip add 192.168.0.1 255.255.255.252
encapsulation hdlc
5 comments
Click here for comments92% with this
ReplyOffice 2
ntp server 10.10.1.2 key 15
snmp-server community CiscoPTSA RO
logging trap debugging
logging 10.10.1.2
service timestamps log datetime msec
router eigrp 1
passive-interface GigabitEthernet0/1
network 10.10.0.0 0.0.0.3
network 10.10.2.0 0.0.0.3
network 10.10.1.0 0.0.0.255
no auto-summary
interface Tunnel0
no shutdown
ip address 10.10.10.1 255.255.255.252
tunnel source s0/0/0
tunnel destination 10.10.2.2
int s0/0/0
no shut
encapsulation frame-relay
ip add 10.10.2.1 255.255.255.252
username hq password PTSAchap
int s0/0/1
no shut
encapsulation ppp
ppp authentication chap
ip add 10.10.0.2 255.255.255.252
-Branch 12
router eigrp 1
passive-interface GigabitEthernet0/0
no auto-summary
network 10.10.2.0 0.0.0.3
network 10.10.10.0 0.0.0.3
network 10.10.3.0 0.0.0.255
interface Tunnel0
no shutdown
ip add 10.10.10.2 255.255.255.252
tunnel source s0/0/0
tunnel destination 10.10.2.1
int s0/0/0
ip add 10.10.2.2 255.255.255.252
encapsulation frame-relay
no shut
HQ
router eigrp 1
passive-interface GigabitEthernet0/0
no auto-summary
network 192.168.0.0 0.0.0.3
network 172.16.0.0 0.0.0.3
network 10.10.0.0 0.0.0.3
redistribute static
username Office-2 password PTSAchap
int s0/0/1
no shut
clock rate 128000
ip add 10.10.0.1 255.255.255.252
encapsulation ppp
ppp authentication chap
ip nat inside
ip nat pool DYNAMIC 203.0.113.3 203.0.113.10 netmask 255.255.255.240
ip nat inside source list 1 pool DYNAMIC
ip nat inside source list 2 interface Serial0/1/0 overload
ip access-list standard 2
permit 10.10.1.0 0.0.0.255
permit 10.10.3.0 0.0.0.255
ip access-list standard 1
permit 192.168.1.0 0.0.0.255
int s0/0/0
no shut
clock rate 128000
ip add 192.168.0.2 255.255.255.252
encapsulation hdlc
ip nat inside
ip route 0.0.0.0 0.0.0.0 s0/1/0
ip nat inside source static 172.16.0.2 203.0.113.14
int g0/0
ip nat inside
int s0/1/0
ip nat outside
router eigrp 1
passive-interface GigabitEthernet0/1
no auto-summary
network 192.168.0.0 0.0.0.3
network 192.168.1.0 0.0.0.255
int s0/0/0
no shut
ip add 192.168.0.1 255.255.255.252
encapsulation hdlc
Office1
router eigrp 1
passive-interface GigabitEthernet0/1
no auto-summary
network 192.168.0.0 0.0.0.3
network 192.168.1.0 0.0.0.255
int s0/0/0
no shut
ip add 192.168.0.1 255.255.255.252
encapsulation hdlc
hi , do you have version in ext pka?
Replythank you
how do you telnet into each router? im having quite an off day
ReplyWe provide high quality 200-125 Dumps PDF to get certification in Cisco CCNA . Each product is affordable, simple with fast download CCNA EXAM, and easy to understand.
Reply200-125 CCNA Dumps PDF
ReplyConversionConversion EmoticonEmoticon